Concrete Slump Test for Workability: A Complete Guide (ASTM C143)
The concrete slump test is the fastest, cheapest, and most widely used method on U.S. job sites for checking the workability of fresh concrete. Before a single truck discharges into your forms, a field technician drops a cone of concrete, measures how far it slumps, and decides in under three minutes whether the batch is fit to place. Get it wrong, and you’re looking at honeycombing, cold joints, segregation, or a rejected load.
This guide walks through everything you need to know about the slump test—what it measures, the exact ASTM C143 procedure, the three types of slump, how to read the results, and the recommended slump ranges for common concrete applications in the United States.
What Is the Concrete Slump Test?
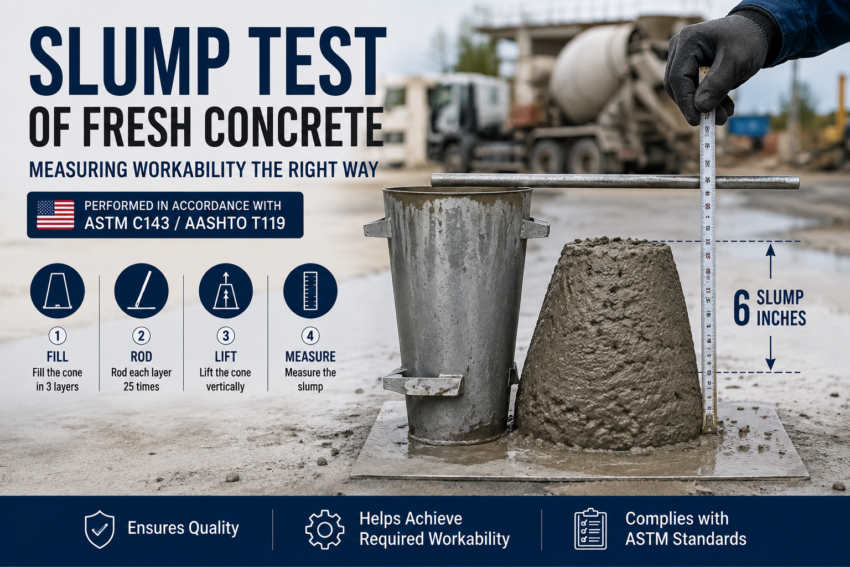
The slump test measures the consistency of fresh concrete—essentially, how much a standardized cone of concrete sags under its own weight once the Mold is removed. That vertical drop, measured in inches, is the slump value.
The test is governed in the U.S. by ASTM C143/C143M, “Standard Test Method for Slump of Hydraulic-Cement Concrete.” It uses a truncated metal cone (often called the Abrams cone, after Duff Abrams, who developed the method in the early 1900s). Because the same cone, rod, and steps are used everywhere, the results are comparable batch to batch and site to site.
One important distinction: slump measures consistency, which is closely related to but not identical with workability. Two mixes can have the same slump but behave differently under placement because of aggregate shape or admixtures. Still, for routine quality control, slump is the accepted proxy.
Why the Slump Test Matters?
-
Batch-to-batch consistency. A sudden jump in slump usually signals extra water in the truck or a batching error, both of which threaten strength and durability.
- Water-cement ratio control. Adding water on-site to increase slump raises the w/c ratio and lowers compressive strength. Slump helps flag unauthorized water.
- Acceptance or rejection. Specs typically state a target slump with a tolerance (for example, 4 in ± 1 in). A load outside that window can be rejected before it’s placed.
-
Placement suitability. The right slump makes concrete easy to pump, place, and consolidate around congested reinforcement.
-
Speed and cost. It takes one technician, a few dollars of equipment, and about three minutes—no lab required.
Apparatus Required for the Slump Test
Per ASTM C143, you need the following:
-
Slump cone (mold): A frustum of a cone made of galvanized steel or another non-reactive metal, with a bottom diameter of 8 in (200 mm), a top diameter of 4 in (100 mm), and a height of 12 in (300 mm). It has foot pieces and handles.
-
Tamping rod: A straight steel rod 5/8 in (16 mm) in diameter and about 24 in (600 mm) long, with one end rounded to a hemispherical tip.
-
Base plate: A flat, rigid, non-absorbent surface (a smooth steel plate is ideal).
-
Measuring device: A ruler or tape graduated to at least 1/4 in.
-
Scoop and tools for placing and striking off the concrete, plus a moist cloth to dampen the mold.
Concrete Slump Test Procedure (Step by Step)
The following steps follow ASTM C143. The entire test—from filling to measurement—must be completed within 2.5 minutes, and the sample should be tested promptly after it’s obtained.
1. Dampen the mold and set it on a level surface. Place the moistened cone, small end up, on a flat, moist, non-absorbent, rigid base. Stand on the foot pieces to hold it firmly so it can’t move while you fill it.
2. Fill the first layer. Add concrete to about one-third of the mold’s volume (roughly 2-5/8 in deep). Rod this layer 25 times with the tamping rod, distributing the strokes evenly and rodding through the full depth of the layer.
3. Fill the second layer. Add concrete to about two-thirds of the mold’s volume (roughly 6-1/8 in deep). Rod 25 times, letting the rod just penetrate about 1 in into the first layer.
4. Fill the third layer. Overfill the mold slightly. Rod 25 times, penetrating about 1 in into the second layer. Keep a surplus of concrete on top throughout rodding; add more if it drops below the rim.
5. Strike off the Top. Once the top layer is rodded, level the surface flush with the top of the mold using a screeding and rolling motion of the tamping rod.
6. Remove the Mold – Immediately lift the cone straight up, with no twisting or sideways motion, over 5 ± 2 seconds. Do not disturb the concrete.
7. Measure the slump. Set the empty mold beside the specimen, lay the tamping rod across the top of the mold, and measure the vertical distance from the underside of the rod down to the displaced original center of the top surface of the slumped concrete. Record to the nearest 1/4 in (5 mm). That distance is the slump.
If the specimen shears off to one side (see below), disregard the test and repeat with a fresh sample.
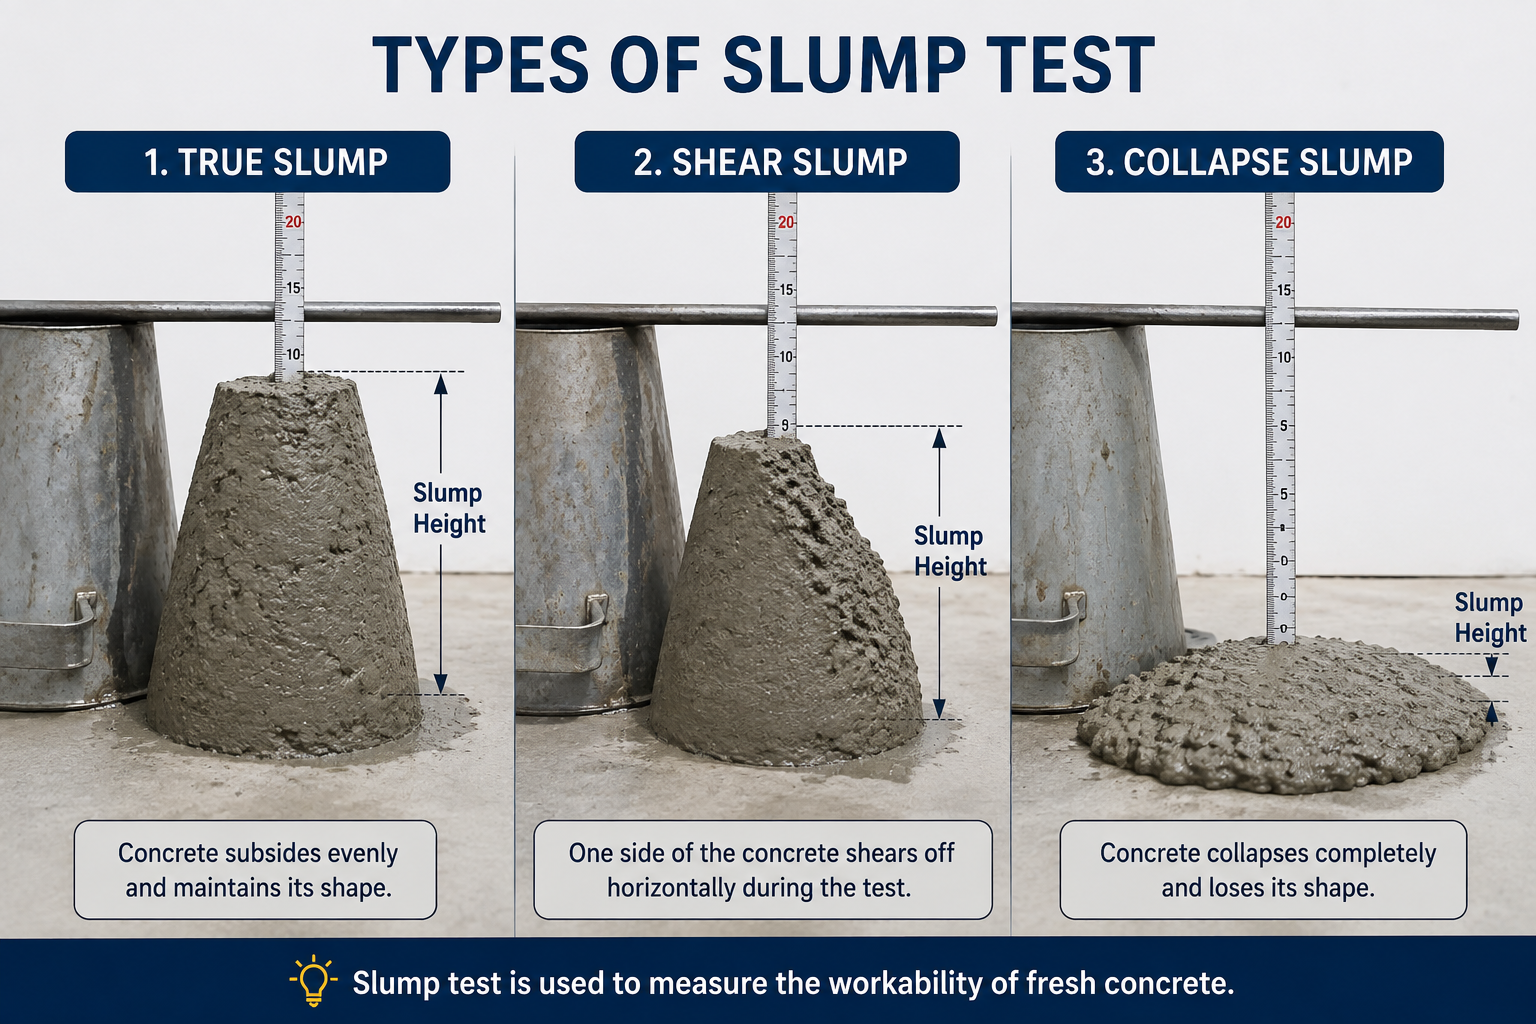
Types of Slump
True slump
The concrete subsides more or less evenly, keeping its symmetrical, intact shape. This indicates a cohesive, well-proportioned mix.
Shear slump
The top portion shears off and slides down one side. This points to a mix that lacks cohesion, is harsh, or is prone to segregation. When a shear slump occurs, ASTM C143 directs you to disregard it and retest with another portion of the sample. If two consecutive tests shear, the concrete likely lacks the plasticity and cohesiveness needed for the slump test to apply.
Collapse slump.
The concrete collapses completely. This usually means the mix is too wet or too lean, with very high (often excessive) fluidity. A collapse is not a reliable measurement.
Zero slump.
The concrete doesn’t subside at all. This is normal for very dry, stiff mixes used in pavements, roller-compacted concrete, and some precast work, but the slump test can’t discriminate well among very dry mixes.
Slump Values and Workability
As a general guide, slump correlates with workability roughly as follows:
| Slump | Workability | Typical use |
|---|---|---|
| 0–1 in (0–25 mm) | Very low | Road pavements, mass concrete, machine-placed work |
| 1–2 in (25–50 mm) | Low | Lightly reinforced sections, foundations |
| 2–4 in (50–100 mm) | Medium | Normal reinforced concrete: footings, slabs, walls |
| 4–7 in (100–175 mm) | High | Heavily reinforced sections, columns, pumped concrete |
| Over 7 in (175 mm) | Very high | Congested reinforcement, self-consolidating tendencies (verify segregation) |
These are broad bands. Modern mixes with water-reducing and high-range admixtures can achieve high slump at a low water-cement ratio without sacrificing strength, so a high number is not automatically a red flag—context matters.
Recommended Slump for Common U.S. Applications
The historic ACI 211.1 guidance gives useful target ranges for typical construction.
| Application | Recommended slump |
|---|---|
| Reinforced foundation walls and footings | 1–3 in |
| Plain footings, caissons, substructure walls | 1–3 in |
| Beams and reinforced walls | 1–4 in |
| Building columns | 1–4 in |
| Pavements and slabs | 1–3 in |
| Mass concrete | 1–2 in |
In current practice, project specifications and the mix design—often built around admixtures and pumpability—will state the required slump and tolerance. Always defer to the project specs over generic tables.
Factors Affecting Slump Value
-
Water content and water-cement ratio. More water means more slump—but also lower strength and durability, which is why adding water on-site is tightly controlled.
-
Aggregate shape, size, and grading. Rounded, well-graded aggregate flows more easily and increases slump; angular, poorly graded, or flaky aggregate reduces it.
- Cement content and fineness. Higher paste content generally improves flow up to a point.
-
Admixtures. Water reducers and superplasticizers raise slump without added water; retarders and certain air-entraining agents also influence consistency.
-
Time and temperature. Concrete loses slump as it hydrates. Hot weather accelerates slump loss, so testing the same load 30 minutes apart can give different numbers.
-
Air content. Entrained air acts somewhat like a lubricant and can slightly increase workability.
Advantages of Slump Test
-
Simple, fast, and inexpensive with minimal equipment.
-
Field-friendly and requires no laboratory setup.
-
Provides an immediate, standardized check for quality control.
Limitations of Slump Test
-
Not suitable for very dry (zero-slump) or very wet (collapse) mixes.
-
Not applicable to concrete with maximum aggregate size larger than 1.5 in (37.5 mm) unless the larger particles are wet-sieved out.
-
Measures consistency, not the full picture of workability, cohesion, or compactability.
-
It’s a static test that doesn’t capture how concrete behaves under vibration or pumping.
-
Results are sensitive to technique, so operator error can skew readings.
For everyday structural concrete, though, the slump test remains the default.
Common Mistakes and Best Practices
-
Not holding the Mold down. If it lifts or shifts during filling, the test is invalid. Keep both feet on the foot pieces.
-
Skipping the damp Mold. A dry, absorbent surface pulls water from the mix and distorts results.
-
Under- or over-rodding. Use exactly 25 strokes per layer, evenly distributed and at the correct penetration depth.
-
Lifting the cone incorrectly. Raise it straight up in 5 ± 2 seconds—no twisting, no side motion.
-
Testing too late. Complete the test within 2.5 minutes; slump loss makes late readings meaningless.
-
Poor sampling. Take a representative sample per ASTM C172; a non-representative scoop gives a non-representative result.
Conclusion
The concrete slump test earns its place as the go-to workability check because it’s fast, cheap, standardized, and genuinely useful. Master the ASTM C143 procedure—dampen the mold, rod each of three layers 25 times, lift straight up in 5 ± 2 seconds, and measure to the nearest 1/4 in—and you’ll catch batching problems before they become structural ones. Read the shape of the slump alongside the number, respect the test’s limits, and always defer to the project specification for the target value.
Read Also-
Top 10 Concrete Admixture Making Companies in USA (2026 Updated)
Ferrocement Concrete: New Generation Concrete
OSHA Field Safety and Health Manual
Different types of Concrete Admixtures (Concrete Technology)
FAQs
It measures the consistency and workability of fresh concrete, giving a quick field check of whether a batch matches the specified mix before it’s placed.
ASTM C143/C143M. Sampling follows ASTM C172, and self-consolidating concrete uses the slump flow test, ASTM C1611.
True slump (valid, even subsidence), shear slump (one side shears off—retest), and collapse slump (the mix collapses, usually too wet). Zero slump describes very dry mixes that don’t subside.
No. It isn’t suitable for very dry or very wet mixes, or for concrete with aggregate larger than 1.5 in unless those particles are removed by wet-sieving.